

How To Lockpick In Elder Scrolls Online
|
Contents
|
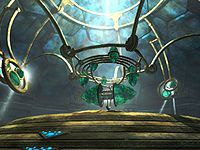
| Hidden, deep within Blackreach, lies an Elderberry Gyre |
Quick Walkthrough [edit]
- Accept the chore from Paarthurnax.
- (Optional) Talk to Esbern or Arngeir.
- Read through the rare books provided by Urag gro-Shub.
- Receive the necessary items from Septimus Signus.
- Locate the ancient Dwemer city of Blackreach.
- Claim the Elder Scroll.
Detailed Walkthrough [edit]
Fragments of Creation [edit]
Alduin'southward Wall documents how the ancient Nords of the First Era used a special shout to assist them dispose of Alduin. Your search for this detail shout takes you to High Hrothgar and eventually to the leader of the Greybeards, the dragon Paarthurnax. He reveals that the Throat of the World was indeed the battlefield where the ancient Nords fought Alduin and ended the Dragon State of war. He as well reveals that the Dragonrend shout was not enough to truly defeat Alduin, in reality just crippling him. In a last try to blackball Alduin, the Nords were forced to use an Elder Roll to send their foe forrard in time, postponing the threat, but non ending it. The event created a rift in fourth dimension itself atop the mountain, known as the Fourth dimension-Wound. Paarthurnax believes that, in gild to larn the Dragonrend shout, you will have to locate the Elder Scroll, and then use it to open up the Time-Wound and learn the shout from the aboriginal Nords that created it. To begin your lengthy quest for the legendary Scroll, you will need to talk to either Arngeir or Esbern.
An Incomprehensible Book [edit]
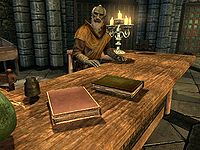
Urag gro-Shub and his two books on the Elder Scrolls
Make your mode to the Higher of Winterhold. If you accept not joined the College, y'all will be forced to start the initiation quest, First Lessons, to get past gatekeeper Faralda. If you are already a member, enter the College every bit normal and follow your map marker to the Arcanaeum. Here you will detect the librarian Urag gro-Shub. Later analytical you for your ignorance, he volition fill yous in on the potential dangers of the Scrolls: "An Elder Scroll is an musical instrument of immense noesis and power. To read an Elder Scroll, a person must have the about rigorously trained heed, or else adventure madness. Fifty-fifty then, the Divines usually take the reader's sight as a cost." He volition then elaborate on the incredible nature of the Elderberry Scrolls: "The simplest mode to put it is "knowledge," just at that place's nil simple about an Elder Roll. It'due south a reflection of all possible futures and all possible pasts. Each reader sees different reflections through unlike lenses, and may come up abroad with a very different reading. Simply at the same time, all of information technology is truthful. Fifty-fifty the falsehoods. Especially the falsehoods." You can also inquire him who wrote the Elderberry Scrolls and he will respond: "It would have a month to explicate to you how that very question doesn't even brand sense. The Scrolls exist here, with the states, only too beyond and beneath. Before and after. They are bits of Divine made substance so we could know them. Some people who written report them devoutly go mad."
Naturally, Urag does not have a Scroll lying around, and he wouldn't but requite it to you if he had. Subsequently a short discussion, Urag leaves his spot backside the counter and fetches two rare books for you, Ruminations on the Elderberry Scrolls and Effects of the Elder Scrolls. The first book is written by Septimus Signus and starts the concurrent quest Discerning the Transmundane when opened. When you tell Urag that Signus's book is incomprehensible, he volition explicate that Septimus Signus is a specialist in Elder Scrolls lore, but he has non been back to the College for a long time. He mentions that Signus became obsessed with the Dwemer and took off north to written report an old artifact.
Beyond the Physical World [edit]
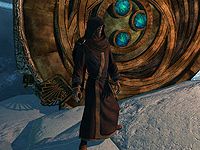
Septimus Signus and the Dwemer lockbox
From this point, the quest Discerning the Transmundane will exist function of your quest to claim the Elder Scroll. Follow your map marker to a remote ice cavern named Septimus Signus's Outpost and enter. Inside you lot will discover Septimus Signus pacing earlier a huge device with a foreign-looking lock, muttering to himself most the Dwemer. When questioned on the Elder Scrolls, his answer will be just as incomprehensible as his volume: "Elder Scrolls. Indeed. The Empire. They absconded with them. Or so they recollect. The ones they saw. The ones they thought they saw. I know of one. Forgotten. Sequestered. But I cannot get to it, not poor Septimus, for I... I have arisen beyond its grasp." When y'all inquire as to the location of the Whorl, he will respond: "Hither. Well, hither as in this plane. Mundus. Tamriel. Nearby, relatively speaking. On the cosmological scale, information technology's all nearby." He will then agree to help you, but only if you help him, naturally. He'll point towards the Dwemer lockbox in the icy cave and say: "You come across this masterwork of the Dwemer. Deep inside their greatest knowings. Septimus is clever amid men, but he is only an idiot child compared to the dullest of the Dwemer. Lucky and then they left backside their own manner of reading the Elder Scrolls. In the depths of Blackreach one nevertheless lies." He will explain what Blackreach is and what yous must go through: "Nether deep. Below the dark. The hidden keep. Belfry Mzark. Alftand. The point of puncture, of first entry, of the tapping. Delve to its limits, and Blackreach lies just beyond. But not all tin enter there. Only Septimus knows the hidden key to loose the lock to jump beneath the deathly rock."
While it is clear that Septimus doesn't intendance about the Elderberry Curl itself, it is quite articulate that he needs the information it possesses. You will have no choice but to assist him. He will hand you two items, the Blank Dictionary and the Attunement Sphere. A knowledgeable person indeed, he will then provide his complex caption on what to do with the items, including a tip that will testify valuable later. He will also provide his knowledge on what defines an Elder Gyre: "Y'all await to your left, you see ane way. You wait to your right, you see some other. Just neither is any harder than the reverse. Simply the Elder Scrolls... they look left and right in the stream of fourth dimension. The futurity and past are as i. Sometimes they even look upwards. What do they see then? What if they dive in? Then the madness begins."
![]()
![]()
![]()
![]()
![]()
NOTE: While the map marker will point you lot towards Alftand, yous tin gain access to Blackreach from two other ruins, specifically Mzinchaleft and Raldbthar. Nonetheless, if you lot have withal to articulate either of those, the route through Alftand is recommended every bit your map marker will point you in the right direction.
Alftand [edit]
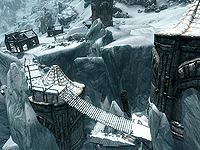
The Dwemer ruin of Alftand is located southwest of Winterhold. The exterior surface area contains a deserted army camp, but upon investigating the ruined shack nearly the military camp, you will find an Expedition Manifest written past trek leader Sulla Trebatius, hinting that you may not exist alone when traversing Alftand. From the shack, head down the slope and enter the showtime zone, Alftand Glacial Ruins.
The Lost Trek [edit]
The icy tunnel ahead contains no enemies just plenty of destroyed cooking spits, and before long you lot volition meet blood spatters all over the floor. A little further down the tunnel, yous will hear the voice of one of the Khajiit members of the expedition in a Skooma-induced bluster, demanding that his companion tell him where the rest of the Skooma is subconscious. Head east through the tunnel and follow the path as information technology twists and turns. You will soon arrive in a room with a table and Calcelmo'due south book Dwarves, v2 along with some Research Notes from Sulla Trebatius. The door to the north is barred, so take the western path and fight the dwarven automatons that guard information technology. Every bit the tunnel becomes icy again, you will encounter J'darr, mad from Skooma withdrawal, who will attack yous on sight. In the corner, you volition discover the corpse of his brother J'zhar, lying in a pool of his own blood.
Leave the bodies behind and caput north until yous accomplish a chamber with 2 dwarven spheres. Proceed forward. To the left, there are a set of rise and falling platforms. If you manage to get onto the tallest of the three, in that location volition exist two unlocked chests, with several potions and a gem on a nearby surface. And then continue through the only available path, where you volition detect a forge and more dwarven spiders. In this room, you can observe Umana'south Journal, which describes how the dangers of Alftand take claimed even more victims. Before you open the western door, there will be a novice locked gate containing two locked chests (adept and apprentice) and various small dwemer items. After opening the western door, beware of the dwarven pressure plate in front end of the breast at the top of the stairs. To the right volition be another dwarven spider, easy to either kill or sneak by, and an expert locked chest. From in that location, head south, where some other spider volition be waiting. Directly past information technology, on your left, will be a room containing a potion of small stamina and a potion of either vigorous or extreme healing. Even further ahead on the right is an amateur locked door. Inside is a dwarven sphere, an unlocked chest, 2 beds, and various other dwarven items. Past this the hallway splits into 2: on the left, a long ledge featuring dwarven spider workers and pipes that could hands button you off; to the right, a lonely spider focused on attacking the wall, and a Blacksmith'due south Potion. Climb beyond to the stop of the ledge and proceed to the Alftand Animonculory.
The Eyeless Creatures [edit]
The Animonculory door opens up into another hallway. Turn left by the first gear in the wall to observe an unlocked chest, a Falmer helmet and shield, a hint every bit to your future enemies, and assorted dwemer items. Open the door at the far end and enter the enormous chamber across. To your right will be a distracted Dwarven Spider Worker; if y'all enter the small pathway side by side to the stairs, you will detect yet another deceased expedition member, Endrast, who is all the same property his journal. On top of the journal are a lockpick and stick of charcoal, and opposite the torso is an adept locked chest. Retrace your steps, climb the stairs and find the gradient to the e, where a Dwarven Sphere is patrolling. At that place are iii pressure plates here that trigger a deadly prepare of spinning blades. Dodge these and proceed to the level.
This room is the showtime very large, multi-leveled sleeping room in Alftand. You are on the top level, so offset making your mode downward the slopes and fight the enemies as y'all go. The area nigh the commencement, as yous step downwardly the beginning ramp, contains a Dwarven Spider, a potion of extreme magicka, and a novice locked breast. When you have traversed one floor, an apprentice locked door to the east leads to some worthwhile treasure. Inside is another Dwarven Spider Worker, ii other gates (One unlocked and open, with an unlocked chest imside; the other with an expert lock. Within are two chests, one unlocked, one principal locked, two potions, a Dwarven Helmet, a skeleton, and a volume.)You'll need to make a short jump downward to proceed, where yous volition land near the body of Yag gra-Gortwog. To the southeast is some other slope leading downwards, where yous will find the starting time Falmer enemy. Stay on the path and kill any Falmer that become in your way. You will achieve a platform with a door and a cleaved pipage spitting out fire. Open the door to go out the huge sleeping accommodation for now and proceed forrard towards an alchemy lab and several Falmer emerging from their tents. Dodge the flames coming from the pipes and head s until you attain a junction. The stairs to the east atomic number 82 to a pocket-sized room with some ingredients, while the path south volition lead y'all to the next room.
In this room, the elevator on the other side of the barred doorway leads back to the previous zone, Alftand Glacial Ruins, so at this point it is possible to return to the outside world and stock up on supplies. Otherwise, skip the elevator ride and locate Sulla Trebatius's Pack. You will as well find a table holding the dead torso of Valie and some other with an assortment of rare ingredients, including a pocket-sized pearl, 1 of only two samples in Skyrim. Find the path to the northeast and open the door. You will find yourself back in the huge central bedchamber, where yous can continue your descent. There are three Falmer and a frostbite spider at the bottom of the bedchamber; dispose of them and locate the door to the north and enter. The next surface area contains a tripwire, which triggers a claw trap. Avert the tripwire and the trap and continue into Alftand Cathedral.
The Dwemer Mechanism [edit]
Alftand Cathedral is the last zone of Alftand, and the smallest every bit well. Upon entering, take a correct plow and contrivance the three pressure level plates, all of which volition trigger a slicer from the ceiling. Fight a single Falmer enemy and open the door to some other huge sleeping room, where you will find more Falmer. Dispose of them, have a moment to explore the room for lots of chests and loot, then head up the stairs next to the entrance and pull the lever. This lowers the spikes blocking the gate to the westward, but approach the expanse carefully equally you will awaken a dwarven centurion. Later on the boxing, loot the centurion for the Key to Alftand Lift and head upwards the stairs. Open the gate where you will witness the last two survivors of the failed trek, Sulla Trebatius and Umana, having a conversation revealing Sulla's true intentions:
Umana: "Sulla look, the passage is open, expect... there's someone down there!"
Sulla: "No! Blackreach was to exist my discovery!"
Umana: "Sulla, permit'south merely go out of here. Hasn't at that place been enough expiry?"
Sulla: "Oh, of form you desire me to go out. Just waiting for me to plough my back. And then you can have all the glory for yourself!"
Sulla and Umana will then go along to fight each other; keep your altitude until one is victorious (usually Umana). The other will then turn against you. Dispose of them and investigate Umana's body for the unique shield Targe of the Blooded. Plow your attention towards the Dwarven Mechanism in the center of the room. Actuate it, and the Attunement Sphere will do the residual, revealing a staircase leading downwardly. Yous tin can return to the outside earth from hither by using your newly acquired key on the gate to the southwest. This will also provide a useful shortcut for later visits (make sure to open the gate at the top of the elevator). From here, head downwards the stairs and prepare yourself for Blackreach.
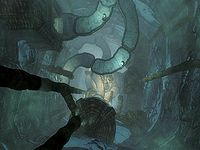
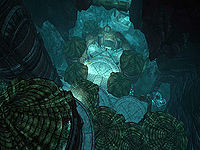
Blackreach [edit]
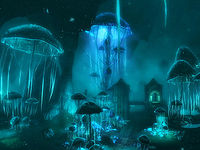
Finally, you will be in Blackreach, a vast, beautiful, eerie, and unsafe cloak-and-dagger cavern that volition take time to traverse completely. Dwarven automatons and Falmer continue to be common enemies, and you may see chaurus and giants as well. Blackreach can exist overwhelming and quite difficult to navigate, specially since your in-game map volition only always allow you to run into a portion of the cavern. Additionally, it is loaded with distractions, so stay on the path for now and keep your center on the prize: the Elder Scroll.
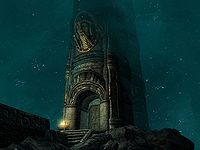
The fastest road from Alftand to the Tower of Mzark is the road to the left, immediately out of the Alftand Cathedral. Continue along the road in a southeastern direction and fight a dwarven sphere and a Falmer. When you come to the first junction, brand a right and head southwest forth that road and fight more than chaurus and another Falmer. Every bit yous travel underneath a bridge, a Falmer will shoot arrows at you from in a higher place, but just move forward and stay on the path. Fight 2 chaurus and continue on until the path turns in a western direction, beyond a bridge. When you cross the span, the Belfry of Mzark volition be visible to the southwest, and the trail will lead yous right to the entrance.
The Elder Scroll [edit]
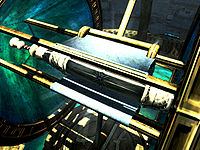
The Elderberry Scroll recovered
Once yous have entered the Tower of Mzark, investigate the first room for some minor loot. The Smithing skill volume The Armorer's Challenge is located in the w facing corner of the room (to the correct of the doorway on the far wall). Proceed through the door and behold a Dwemer contraption that would make even Septimus Signus proud: a behemothic sphere with various lenses fills the unabridged starting time floor of the room. The 2nd floor sits on the upper office of the sphere and, hanging from the ceiling, a series of lenses conceal a container. If you lot investigate the surrounding area, yous will observe the skeletal remains of Drokt. His journal volition inform you lot how he became obsessed with the Oculory, and he seemingly died without managing to align it correctly. The journal also contains a tip on how to solve the puzzle: "The light through the knowledge through the machine rests on the cube." This echoes the words of Septimus Signus: "The Dwemer institute a loophole, as they always practice. To focus the cognition away and inside without impairment. Place the lexicon into their contraption and focus the knowings into it."
With these two tips in mind, caput up the final slope, where y'all will find 4 buttons and a Lexicon Receptacle. Place the Blank Lexicon in the receptacle and watch the ceiling of the room open, shining lite onto the container beneath. This also activates the two buttons on the right. To focus the lenses on the floor, identify yourself so yous can come across the Lexicon and the central flooring. Activate the button on the second pedestal from the right four times in a row and the Lexicon will open up. This likewise activates i of the buttons to the left. Printing the 2d button from the left twice and the lenses in the ceiling will change position, allowing the lite shining through the container to hit the corresponding lenses on the floor, thus filling the Dictionary with noesis. The final button to the left will at present be active, then push it one time and the upper lenses will move aside, making room for the container to be lowered down from the ceiling. In one case information technology has reached the floor, information technology volition open up and reveal the legendary Elderberry Curlicue (Dragon), the very source of the elder knowledge, yours for the taking. Remember to selection upwards the inscribed Runed Lexicon from the receptacle, then claim the Elderberry Gyre. This ends the quest and starts the next one, Alduin's Blight.
Achievements [edit]
1 achievement is unlocked when you complete this quest:
-
 Elder Knowledge (20 points/Bronze)
Notes [edit]
- Attempting to read the Elderberry Ringlet will inflict temporary blindness upon yous.
- Having the Clairvoyance spell can be very helpful for navigating Blackreach.
- If you have already spoken to Urag gro-Shub, yous will have an pick to tell Paarthurnax that the "Lorekeeper" of the College of Winterhold tin can signal yous in the direction of the Scroll.
- If you have already obtained the Elder Gyre during Discerning the Transmundane, as soon as The Pharynx of the World is completed, this quest will be automatically completed as well and Alduin's Bane will begin. This will skip some of Paarthurnax's optional dialogue.
Bugs [edit]
- This quest occasionally conflicts with the College of Winterhold quest line. For instance, if you are doing the quest Containment, Urag gro-Shub will simply say, "we should never have brought that thing here" (referring to the Eye of Magnus). Urag gro-Shub will sometimes lack the dialogue options required to go on Elder Knowledge. At other times he may not even talk to yous, or not place all the books on the desk.
- This can be resolved by either going straight to Septimus Signus and speaking with him, or by finishing the College of Winterhold quests.
-
 Alternatively, PC users can use the console to progress by advancing to phase fourscore (
setstage MQ205 80).
- If you leave the Tower of Mzark without collecting the Elder Scroll and consummate Discerning the Transmundane, collecting the scroll afterwards will have no effect and this quest will be blocked.
Modernistic Notes: Once Discerning the Transmundane is complete, the reference to "ElderScroll" in DA04ElderScrollActivatorScript is no longer valid, breaking the script.
- If this happens, the Scroll will not appear in your inventory later collection.
- This tin can be resolved by collecting the Whorl and then spawning it in your inventory with
player.additem 2d513 1. You should be able to read the Scroll after using this console lawmaking.
- The optional quest objective to talk to Esbern may not exist listed in your periodical.
- This bug is stock-still by version ane.iii.i of the Unofficial Skyrim Patch.
-
- You may not exist able to start this quest if you have removed the Elderberry Scroll from your inventory before meeting Paarthurnax. ?
- This can exist resolved by using
setstage MQ206 10to start Alduin'south Bane
-
Quest Stages [edit]
| Elder Knowledge (MQ205) | ||
|---|---|---|
| Stage | Finishes Quest | Journal Entry |
| ten | I met the chief of the Greybeards, the dragon Paarthurnax. He told me that the ancient Nords used an Elder Ringlet to bandage Alduin forward in time. If I can recover that same Elderberry Ringlet, I may be able to use it to learn the "Dragonrend" Shout directly from the ancient heroes. Objective ten: Larn the location of the Elder Ringlet | |
| xx | Objective 20: (Optional) Talk to Esbern | |
| 30 | Objective 30: or (Optional) Talk to Arngeir | |
| 50 | I met the master of the Greybeards, the dragon Paarthurnax. He told me that the ancient Nords used an Elderberry Coil to cast Alduin frontwards in time. If I can recover that same Elderberry Curlicue, I may be able to employ it to learn the "Dragonrend" Shout straight from the ancient heroes. Esbern suggested that someone at the Higher of Winterhold might know how to find this Elder Scroll. | |
| I met the principal of the Greybeards, the dragon Paarthurnax. He told me that the ancient Nords used an Elder Roll to cast Alduin frontward in time. If I can recover that aforementioned Elder Ringlet, I may be able to utilise information technology to learn the "Dragonrend" Shout directly from the ancient heroes. Arngeir suggested that someone at the Higher of Winterhold might know how to find this Elder Scroll. | ||
| sixty | I met the master of the Greybeards, the dragon Paarthurnax. He told me that the ancient Nords used an Elderberry Curl to cast Alduin forward in time. If I can recover that same Elder Scroll, I may exist able to use information technology to larn the "Dragonrend" Shout straight from the aboriginal heroes. I've learned that a scholar named Septimus Signus might know where to detect it. | |
| 80 | Objective l: Recover the Elder Scroll | |
| 100 | Finishes quest | I met the master of the Greybeards, the dragon Paarthurnax. He told me that the ancient Nords used an Elderberry Scroll to cast Alduin frontwards in time. Now that I've recovered that Elder Scroll, I may exist able to use it to acquire the "Dragonrend" Shout straight from the aboriginal heroes. |
- The post-obit empty quest stages were omitted from the tabular array: 0, i, 40, 45.
Notes
- Whatever text displayed in angle brackets (due east.g.,
<Alias=LocationHold>) is dynamically set by the Radiant Quest organization, and will be filled in with the appropriate word(s) when seen in game. - Not all Periodical Entries may appear in your journal; which entries announced and which entries do non depends on the way in which the quest is done.
- Stages are non ever in guild of progress. This is usually the case with quests that accept multiple possible outcomes or quests where certain tasks may be done in any social club. Some stages may therefore repeat objectives seen in other stages.
- If an entry is marked every bit "Finishes Quest" it ways the quest disappears from the Active Quest listing, but you may still receive new entries for that quest.
- On the PC, it is possible to apply the console to advance through the quest by entering
setstage MQ205 phase, wherestageis the number of the stage you wish to complete. It is not possible to un-complete (i.e. go back) quest stages, but information technology is possible to clear all stages of the quest usingresetquest MQ205.

How To Lockpick In Elder Scrolls Online,
Source: https://en.uesp.net/wiki/Skyrim:Elder_Knowledge
Posted by: fishcurtand.blogspot.com
0 Response to "How To Lockpick In Elder Scrolls Online"
Post a Comment