

Remote Desktop Windows 10 Home Premium
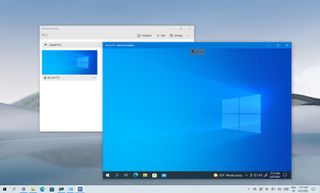
On Windows 10, the "Remote Desktop" app makes information technology like shooting fish in a barrel to connect to other computers over the local network and internet. It's also the experience that replaces the congenital-in legacy "Remote Desktop Connection" feature, which is still bachelor.
The app is user-friendly, merely depending on the device you have to connect, the app is only one of the steps since yous may take to configure additional settings, including forwarding the appropriate port in the router to connect to another Windows x computer. As well, at that place's a pocket-sized problem. Y'all can install the Remote Desktop app on whatsoever edition of Windows ten. All the same, the remote desktop protocol (RDP) that allows connections to a device is but bachelor in the Pro edition and business variants of the OS. Windows 10 Home doesn't let remote connections.
In this Windows x guide, we will walk yous through the steps to let remote connections from within the local network or internet and the steps to use the Remote Desktop app to start a remote session.
- How to allow remote connections on Windows 10
- How to found remote desktop connection on Windows 10
- How to troubleshoot remote desktop connection on Windows 10
How to allow remote connections on Windows 10
Remote Desktop makes it easy to connect to other computers. Even so, the configuration volition depend on whether you have to connect over the local network or through the cyberspace.
Enable remote connections on Windows 10
In a local area network (LAN), you only need to enable the option to allow remote desktop connections on your computer. You tin can complete this task from the Settings app or Control Panel.
Settings app
To enable the Remote Desktop using the Settings app, apply these steps:
- Open Settings.
- Click on System.
- Click on Remote Desktop.
- Turn on the Enable Remote Desktop toggle switch.
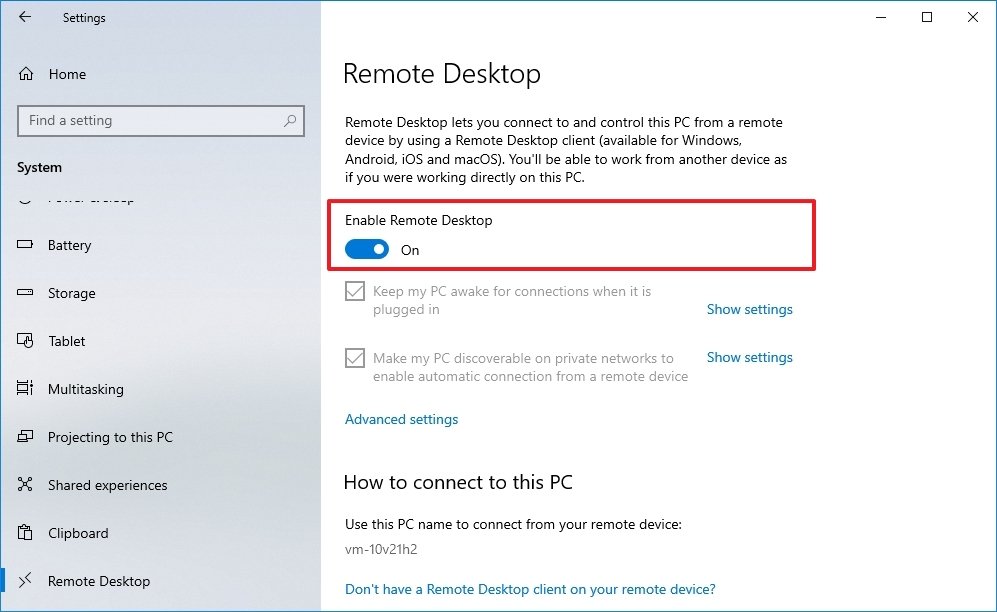
- Click the Ostend push.
In one case you complete the steps, remote desktop connections will be allowed on the device. Windows x will also add the necessary rules in the congenital-in Microsoft Defender Firewall. Even so, you may need to configure the rules manually if you have a third-party firewall.
Control Panel
To enable remote connections on Windows 10, use these steps:
- Open up Control Panel.
- Click on System and Security.
- Under the "Arrangement" section, click the Allow remote access selection.
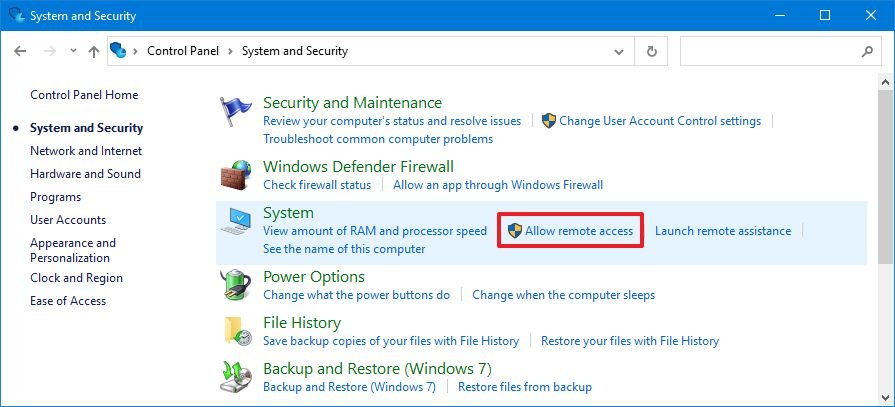
- Click the Remote tab.
- Nether the "Remote Desktop" section, check the Allow remote connections to this computer option.
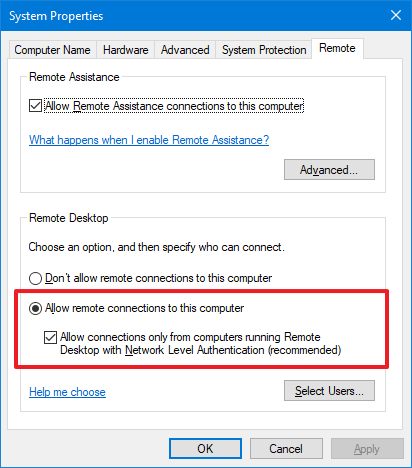
- Cheque the Allow connections only from computers running Remote Desktop with Network Level Hallmark option.
- Click the OK button.
- Click the Utilize button.
- Click the OK button.
If yous demand to configure a remote desktop using an internet connection, go on with the steps below. If you have to connect to another device inside the local network, skip to the steps below, and continue with the commencement a remote desktop connection instructions.
Enable remote connections on router
If the remote connexion has to happen over an internet connection, you lot will also have to configure the router to allow the remote connection. In add-on, you lot volition need to know the public address to contact the remote computer.
Configure static IP address on Windows 10
A computer usually receives a dynamic IP address from the DHCP server (router), which means it can change. If yous programme to use a remote desktop for a long fourth dimension, y'all may desire to configure a static IP accost to avoid reconfiguring port forwarding on the router when the device changes the network configuration.
Control Console
To configure a permanent network configuration, use these steps:
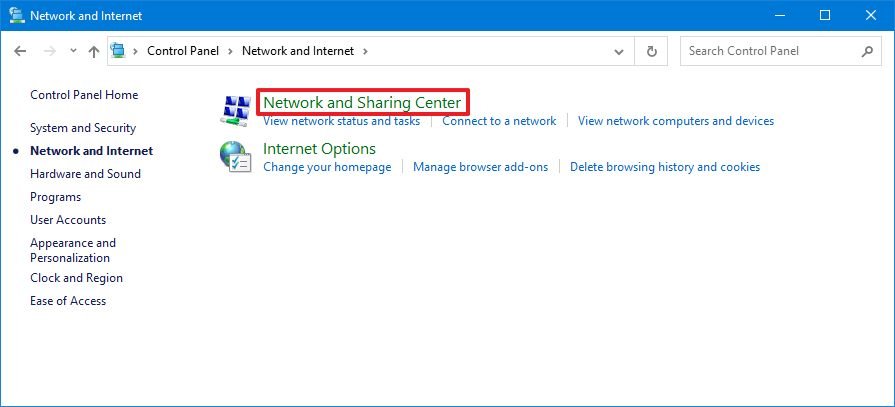
- Open Control Panel.
- Click on Network and Internet.
- Click on Network and Sharing Center.
- Click the Change adapter settings selection from the left navigation pane.
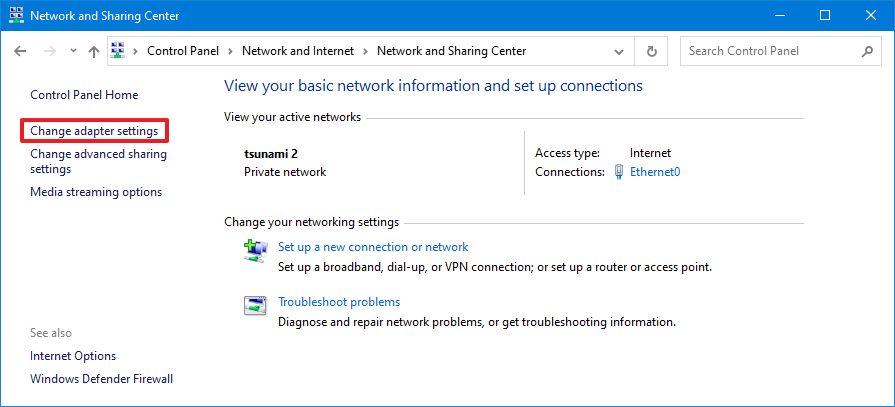
- Right-click the active network adapter and select the Properties option.
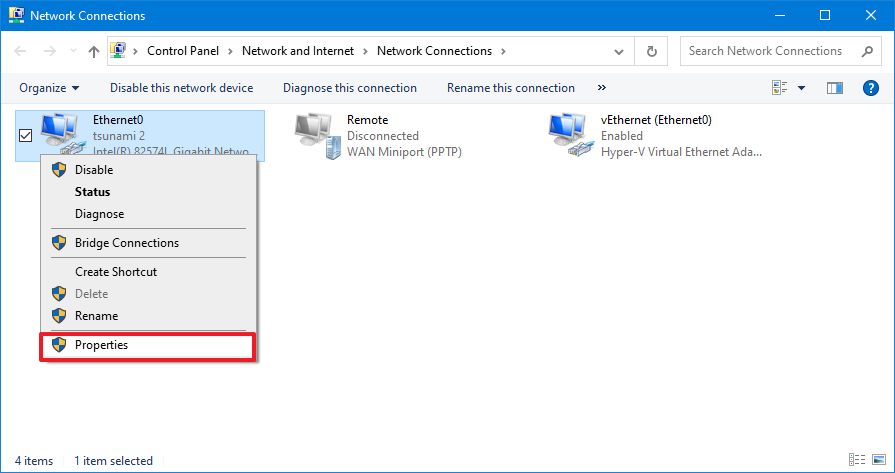
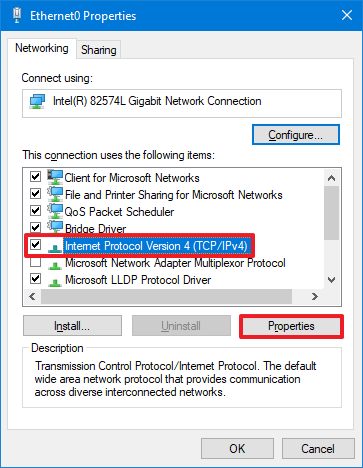
- Select the Internet Protocol Version 4 (TCP/IPv4) pick.
- Click the Properties push button.
- Click the General tab.
- Select the Use the following IP address option.
- Specify a local IP address outside the local DHCP scope to prevent accost conflicts – for example, ten.1.4.201.Quick tip: Usually, yous'll find this data within the DHCP settings section on the router. Since non every router is created equal, you may need to consult your manufacturer support website for more specific details to find this information. If you're unsure of the configuration y'all have to use, use your current TCP/IP configuration every bit a reference, which you can review with the
ipconfig /allcontrol in Command Prompt.
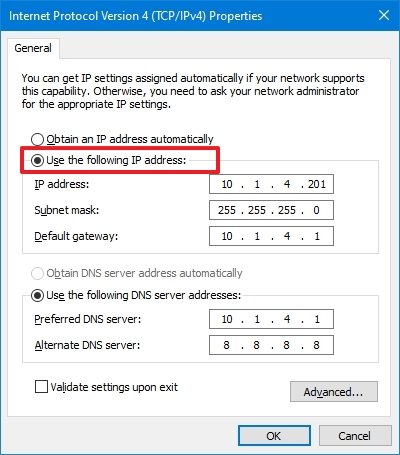
- Specify a subnet mask for the network (for example, 255.255.255.0), but the arrangement normally fills this information from you based on the "IP address."
- Specify the default gateway accost, which should be the router's address — for example, 10.1.4.ane.
- Under the "Use the following DNS server addresses" section, in the "Preferred DNS server" field, specify the IP address of your DNS server, which in most cases is also the address of the router — for instance, 10.i.4.1.Quick tip: If you can't connect to the net, try using ane of the Google Public DNS addresses (such equally 8.eight.eight.eight) for the "Alternate DNS server" option.
- Click the OK button.
- Click the Shut push.
After you lot complete the steps, the network configuration will apply, and the IP settings volition never modify.
Some routers include a feature to make the electric current TCP/IP configuration static. If you desire to employ this option, consult your manufacturer back up website for specific steps to complete this task.
Identify network public IP address
You will also demand the remote network's public IP accost to contact the device over the internet.
To determine the IP accost assigned past the Internet service provider (ISP), use these steps:
- Open up the web browser.
- Visit Bing.com or Google.com.
- Search for "What'due south my IP."
- Confirm the public IP accost in the first effect.
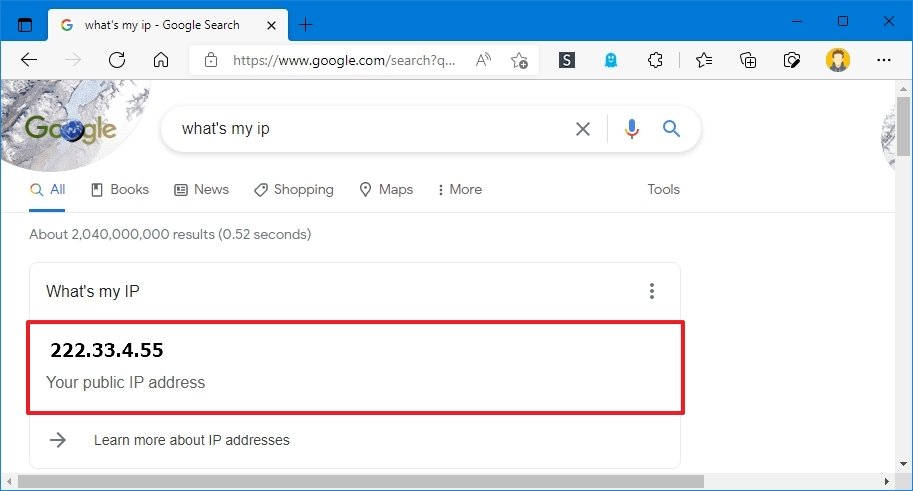
Typically, cyberspace providers also offer dynamic public IP addresses for residential customers, which means that your public IP address may change from time to time.
If you demand a more reliable solution, you may want to look into "Dynamic Domain Proper noun System" (DDNS) services (such as DynDNS, OpenDNS, No-IP, or Asus.com for Asus routers), which can track the public IP changes. Alternatively, y'all tin can also contact your ISP to asking a static IP accost, but it might toll you extra since this is typically a characteristic reserved for businesses.
Configure port forwarding
You must also forward the TCP port 3389 on the router to permit remote connections over the internet to the computer in the local network.
Quick notation: The router interface experience tin can vary depending on the manufacturer. However, y'all tin use these instructions as a reference to configure your router. Y'all can always cheque the manufacturer support website for more specific details.
To forward a port on your router, use these steps:
- Open Kickoff.
- Search for Command Prompt and click the height result to open the app.
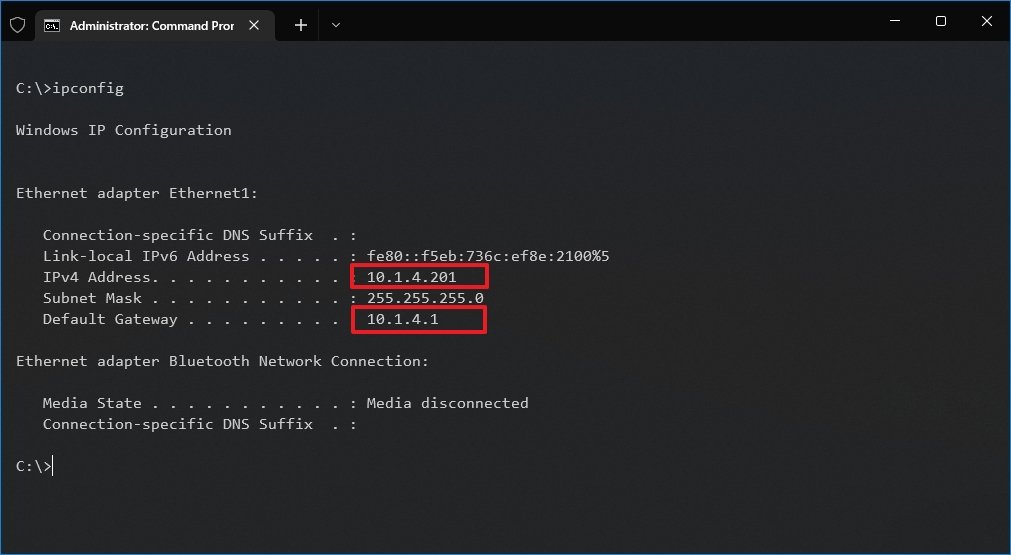
- Blazon the following command to cheque the current TCP/IP configuration and printing Enter:
ipconfig - Under the "IPv4 Accost" field, confirm the device address — for case, ten.1.4.201.
- Under the "Default Gateway" field, ostend the device gateway accost (the router address) — for case, 10.ane.four.ane.
- Open up your preferred browser.
- Type the IP address of the router (default gateway) in the address bar and press Enter.
- Sign into the router using the correct username and password.Quick tip: If you have never done this, and you lot are using the router provided by the Isp, you may be able to discover the information on a sticker attached to the device.
- Open the Port Forwarding settings page.
- Confirm that the Port Forwarding service is enabled (if applicable).
- Under the port forwarding listing, click (in this instance) the Add profile push button.
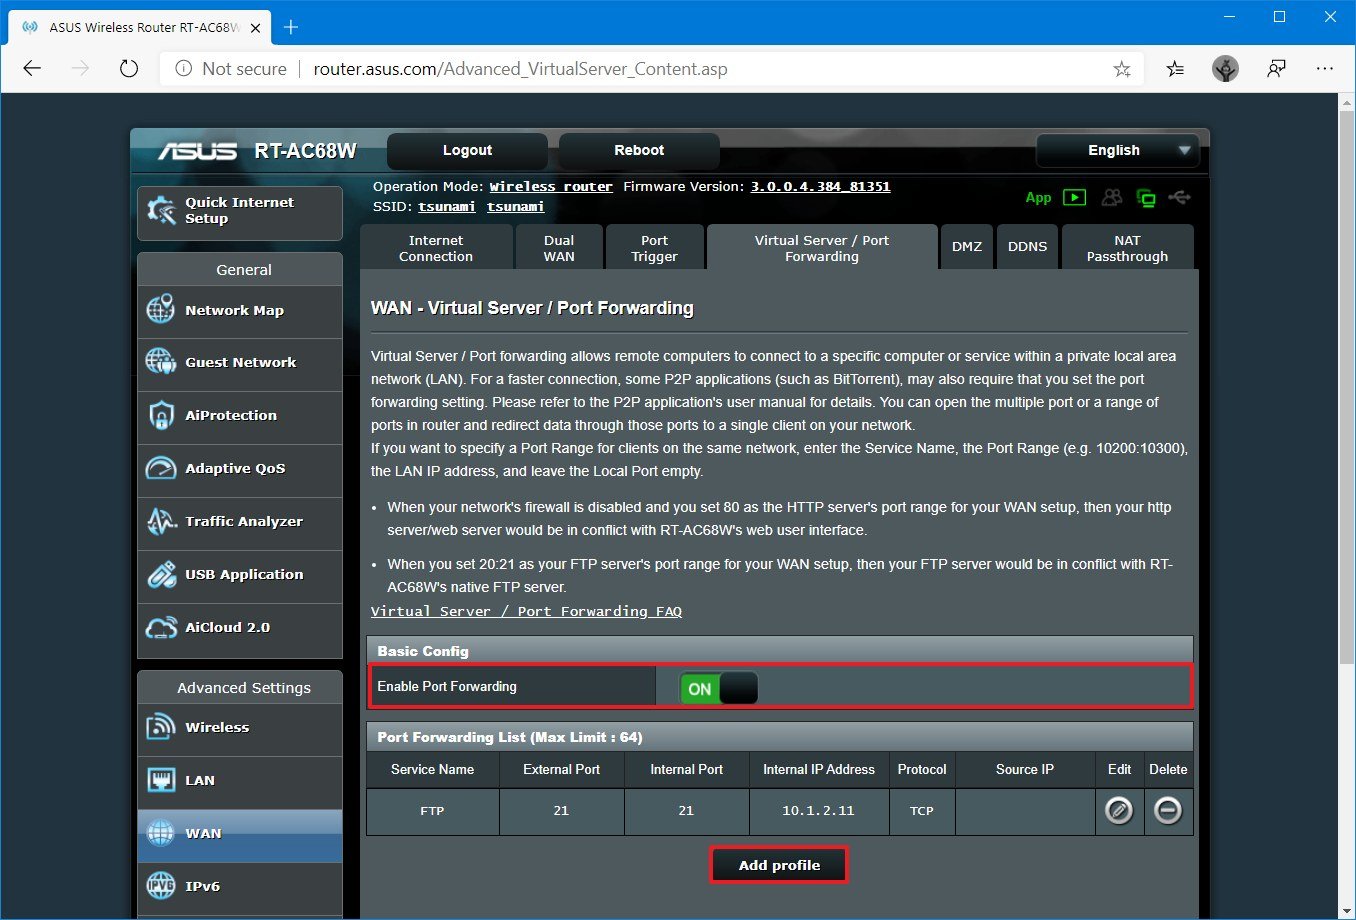
- Create a new port forward with the required information — for example:
- Service name: (optional) Specify the reference name for the service — for instance, OfficePC Remote.
- Protocol: TCP.
- External Port: 3389.
- Internal Port: 3389.
- Internal IP Accost: Specify the IP address of the computer you're trying to connect — for instance, x.1.iv.100
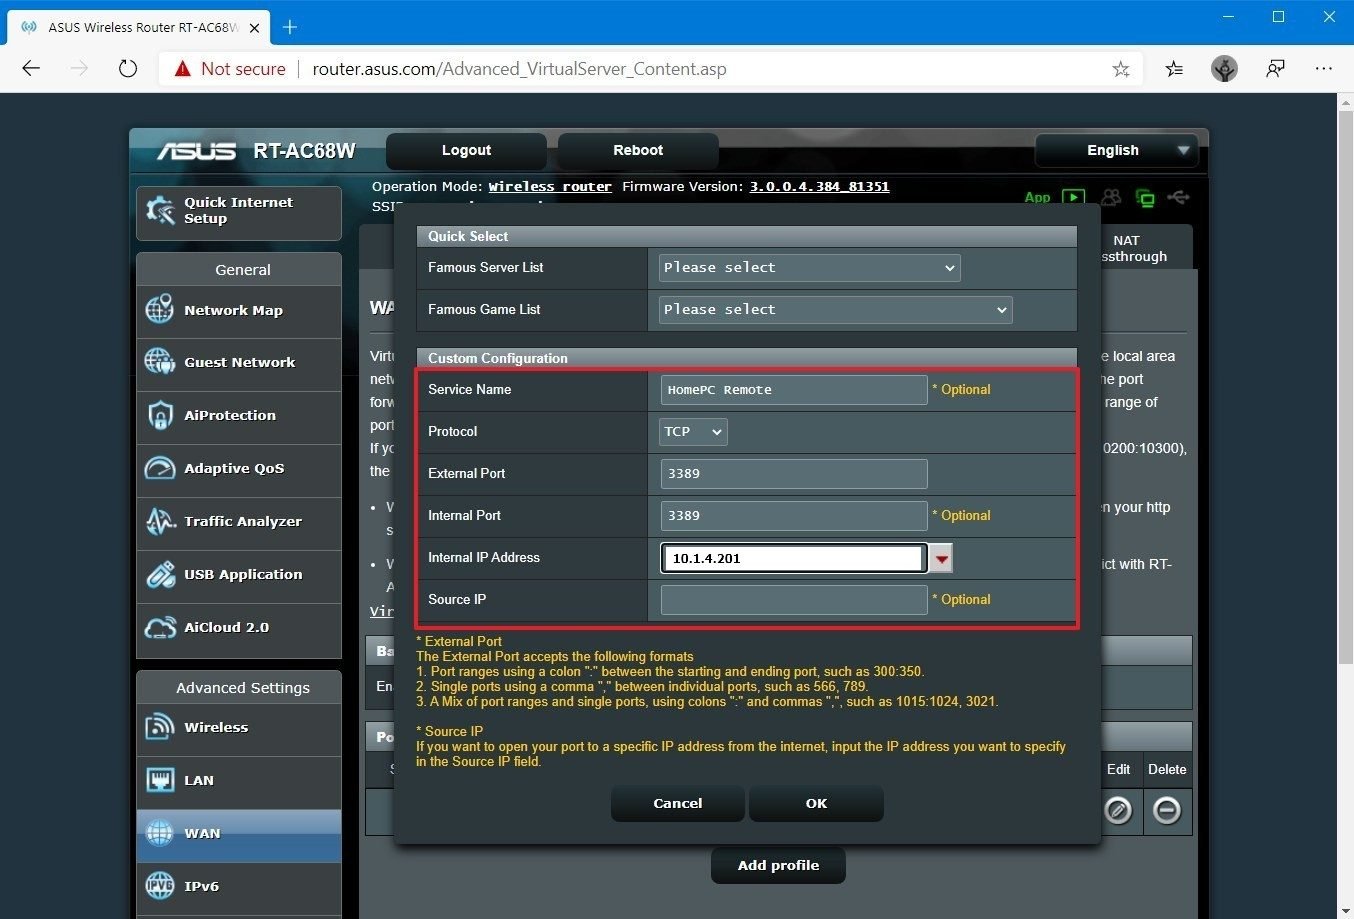
- Click the OK button.
Once you complete the steps, the port volition open on the router, allowing remote desktop connections through the internet to that specific device.
How to establish remote desktop connection on Windows 10
After setting up the computer and router, you can initiate a remote connexion using the Remote Desktop app on Windows 10.
Install Remote Desktop app
The Remote Desktop app should already be bachelor on Windows ten, just you can e'er install information technology from the Microsoft Shop.
To install the Remote Desktop app on Windows 10, use these steps:
- Open Microsoft Remote Desktop app page (opens in new tab).
- Click the Get (or Install) button.
- Click the Open Microsoft Store push button.
- Click the Become (or Install) push.
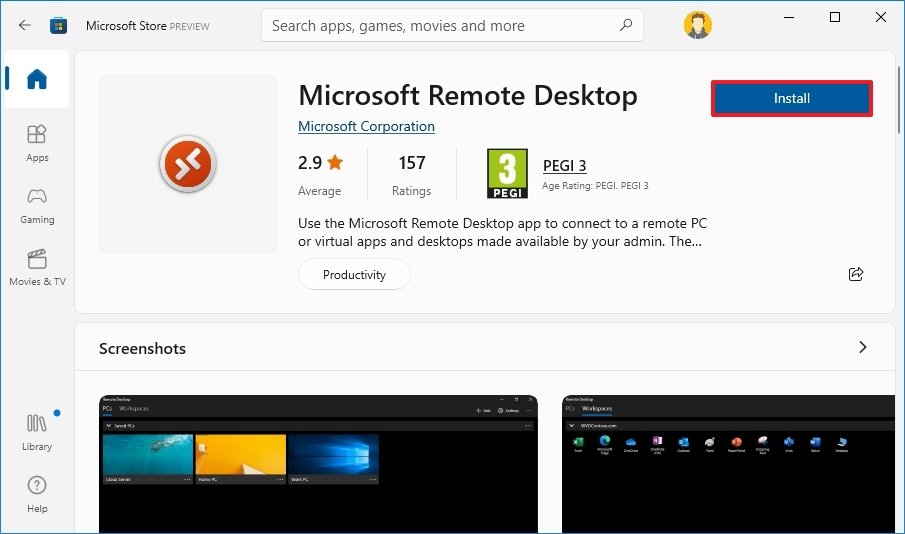
Once you complete the steps, open the app from inside the Microsoft Store or Start card.
Starting time remote desktop connexion
To connect to a computer remotely on Windows ten, use these steps:
- Open up the Remote Desktop app.
- Click the + Add button in the top right.
- Click the PCs selection.
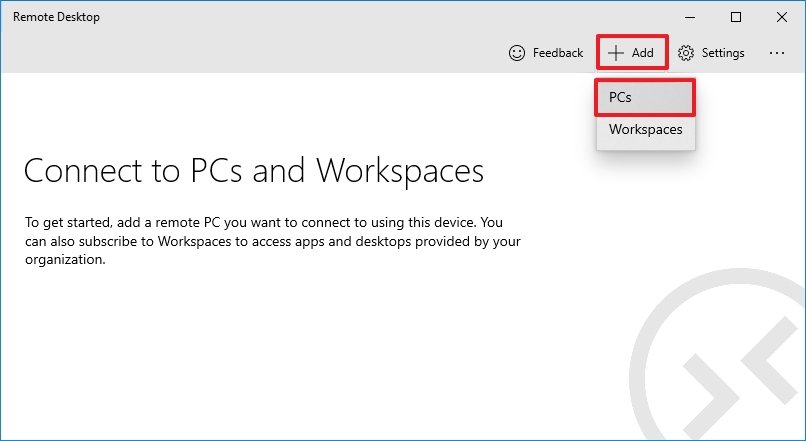
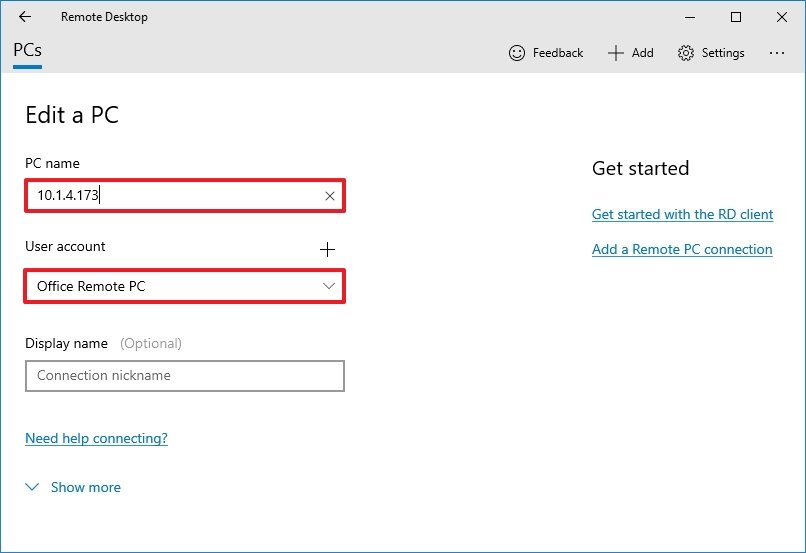
- Under the "PC name" section, specify the TCP/IP address of the remote computer:
- If the device is inside a private network, enter the local IP accost.
- If the device is in a remote network (via the internet), enter the public IP address.
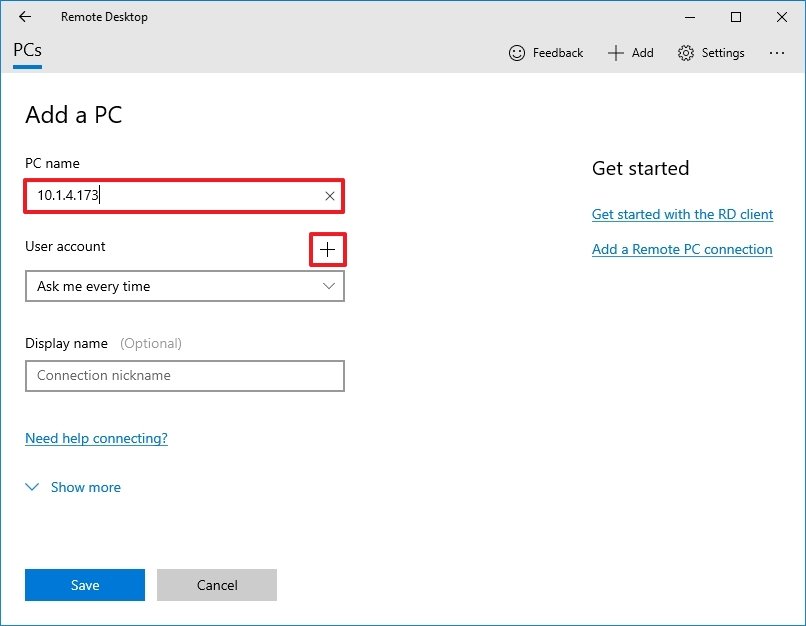
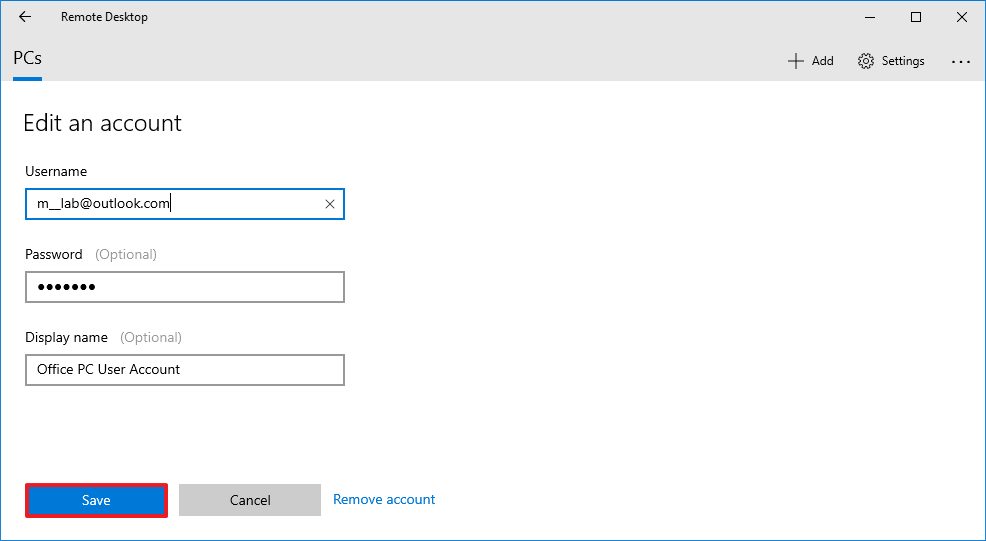
- Under the "User account" section, click the + (plus) push button in the top right.
- Confirm the account information to sign into the remote estimator:
- If the remote device is using a Microsoft account, enter that Microsoft account sign-in data.
- If the remote device uses a local account, enter the local username and password to sign in.
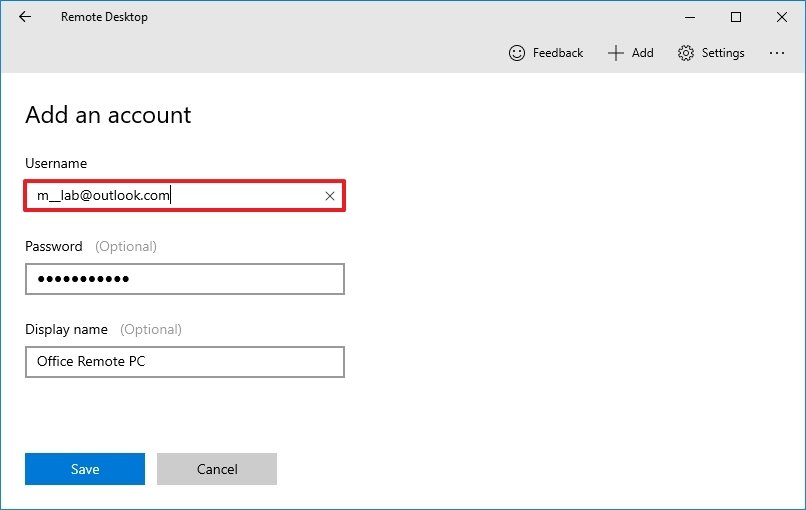
- (Optional) Nether the "Display name" section, specify the account settings' proper noun.
- Click the Save button.
- (Optional) Under the "Brandish name" department, specify the connection's proper noun — for case, Office PC Remote.
- Click the Show more option.
- (Optional) Select additional settings as necessary.Quick tip: The additional settings include the option to connect using an admin session, ready the remote session resolution, and clipboard, among others. Typically, yous don't demand to configure these options, and you lot should simply employ them depending on the scenario.
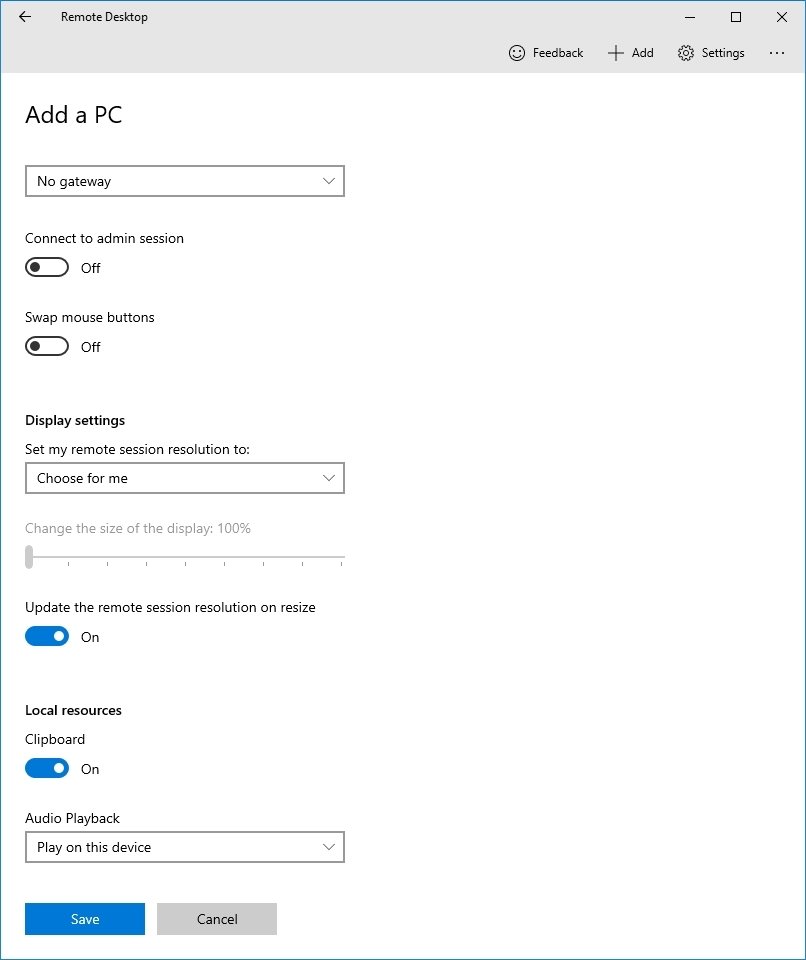
- Click the Salvage button.
- Under the "Saved Desktops" section, click the connection to showtime a remote session.
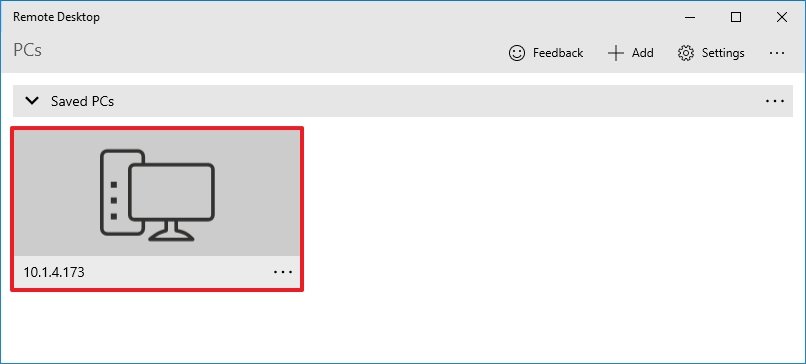
- Check the Don't ask well-nigh this document once more option (if applicable).
- Click the Connect button.
After yous consummate the steps, the remote connection should establish without problems if everything has been configured correctly.
If yous desire to terminate the session, you lot can close the window, or yous tin click the three-dotted menu button from the top-middle and then click the Disconnect button.
Modify app and connection settings
On Windows 10, the Remote Desktop app allows you to customize various settings, including additional configuration options, and modify existing settings.
Modify general settings
To alter general settings in the Remote Desktop app, apply these steps:
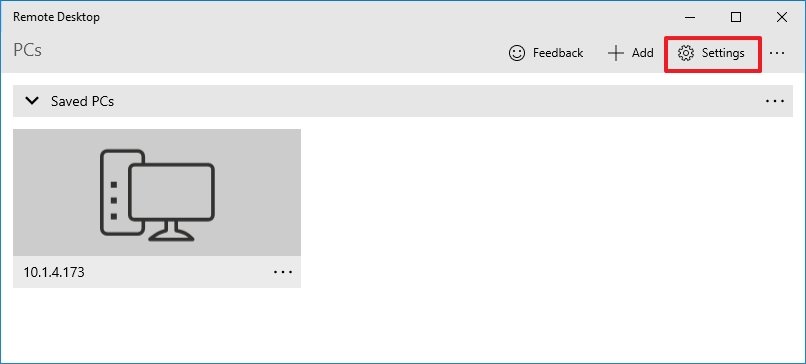
- Open up the Remote Desktop app.
- Click the Settings push in the height right.
- Select the user account from the listing.
- Click the Edit (pen) button to adjust the settings.
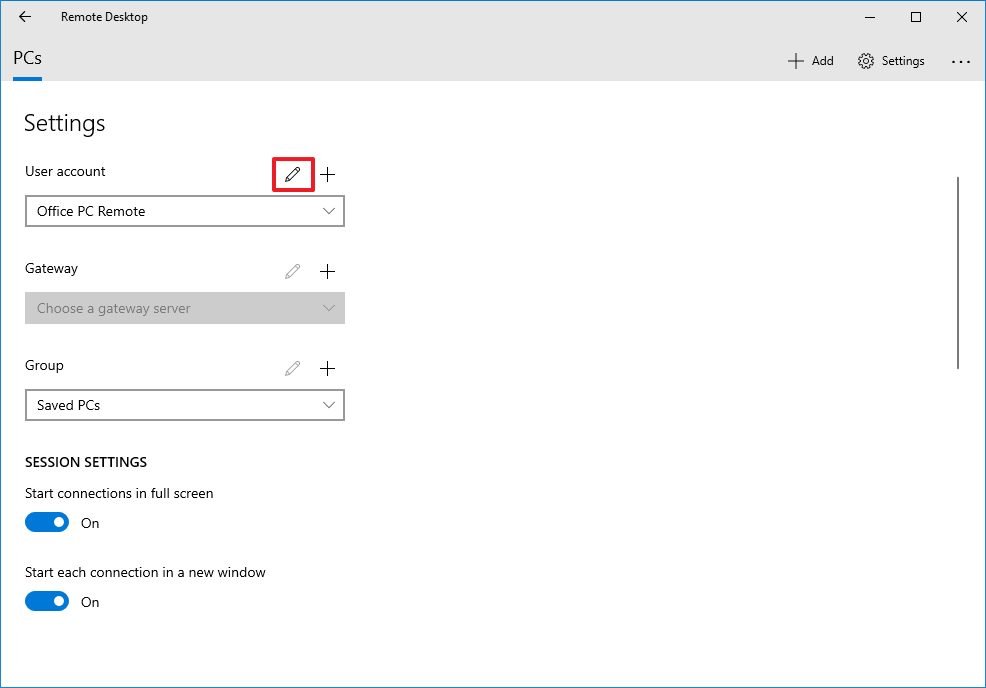
- Click the Relieve push button.
Y'all can also pre-add together boosted user accounts (with the plus + button) that you can utilize later on to connect to other devices or equally a different user.
The Gateway option allows yous to set a gateway server, but you'll rarely need to use this selection. Also, the Group option enables you to organize connections into unlike and more manageable groups.
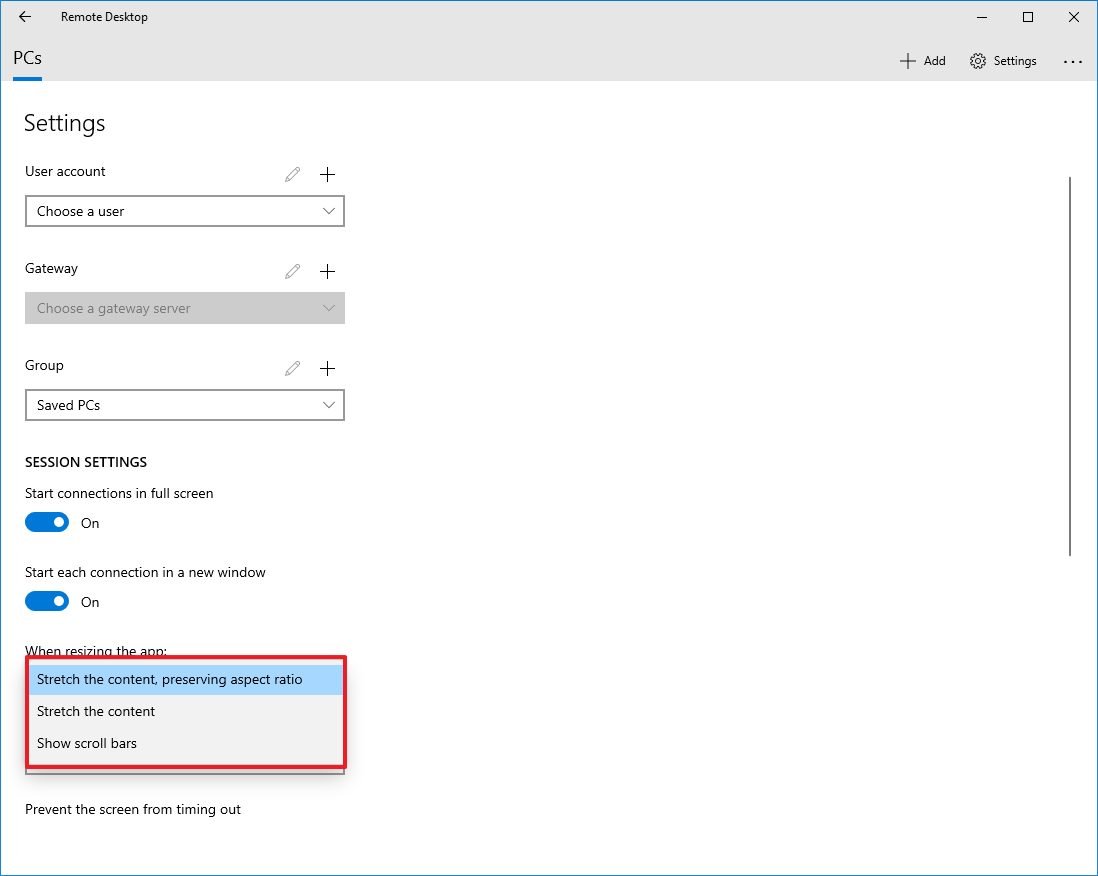
Alter session settings
To change the session settings for Remote Desktop on Windows 10, apply these steps:
- Open up the Remote Desktop app.
- Click the Settings button in the acme correct.
- Turn on or off the Start connections in total screen toggle switch.
- Plow on or off the Start each connection in a new window toggle switch.
- Use the When resizing the app drib-down menu to choose how the remote desktop session will look as yous resize the app. Options available include:
- Stretch the content, preserving aspect ratio (recommended).
- Stretch the content.
- Show curlicue bars.
- Utilise the "Use keyboard command with a" driblet-down menu to choose whether shortcuts (such every bit Ctrl + C and Ctrl + V) work only locally or on the remote desktop. Options available include:
- My local PC merely.
- My remote session when it's in full screen (recommended).
- My remote session when it'south in utilize.
- (Optional) Turn on the Forbid the screen from timing out toggle switch.
Alongside editing the account and session settings, you can also enable the option to show a preview of the remote desktop in the connectedness, which adds a visual queue to make it easier to discover the connection in the app.
Alter connection settings
To edit the settings of a remote connection, employ these steps:
- Open up the Remote Desktop app.
- Click the menu (three-dotted) button in the connection and select the Edit option.
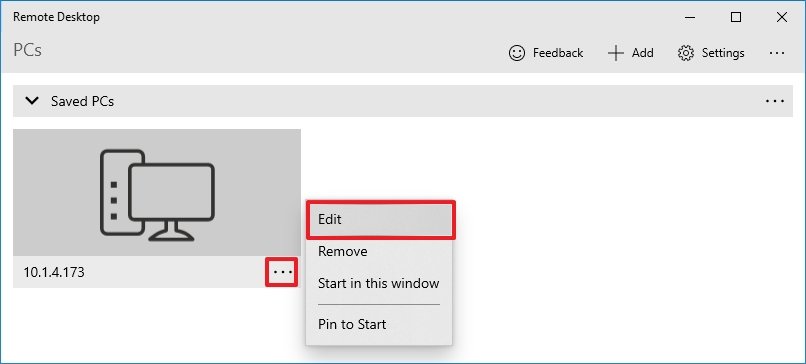
- Change the device proper name, business relationship, and settings as needed.
- Click the menu (3-dotted) button in the connection and choose the Remove selection to delete information technology.
- Click the menu (three-dotted) button in the connectedness, and choose the Pin to Start option to quickly access the remote reckoner from the Start bill of fare.
Once you consummate the steps, the settings will relieve and apply automatically in the connexion.
How to troubleshoot remote desktop connexion on Windows 10
Typically, you won't find issues using the Remote Desktop app, but if you cannot connect to a device, you will need to troubleshoot the problem.
Confirm firewall settings
Windows 10 opens the required firewall ports automatically when you configure Remote Desktop, but it might not ever exist the case. If the connection fails, bank check the firewall to make sure it's allowing the Remote Desktop service.
To enable remote connections through the firewall on Windows 10, utilise these steps:
- Open the Windows Security app.
- Click on Firewall & network protection.
- Click the Allow an app through firewall option.
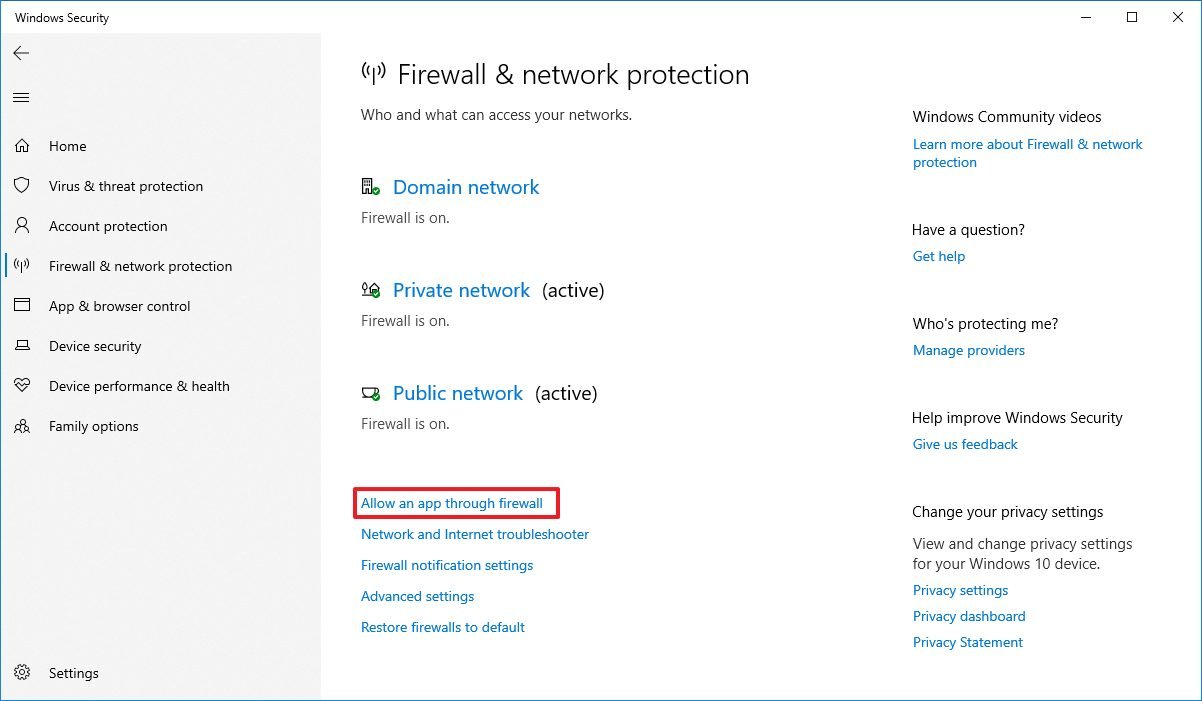
- Click the Change settings button.
- Check the Remote Desktop selection and check the options for Private and Public.
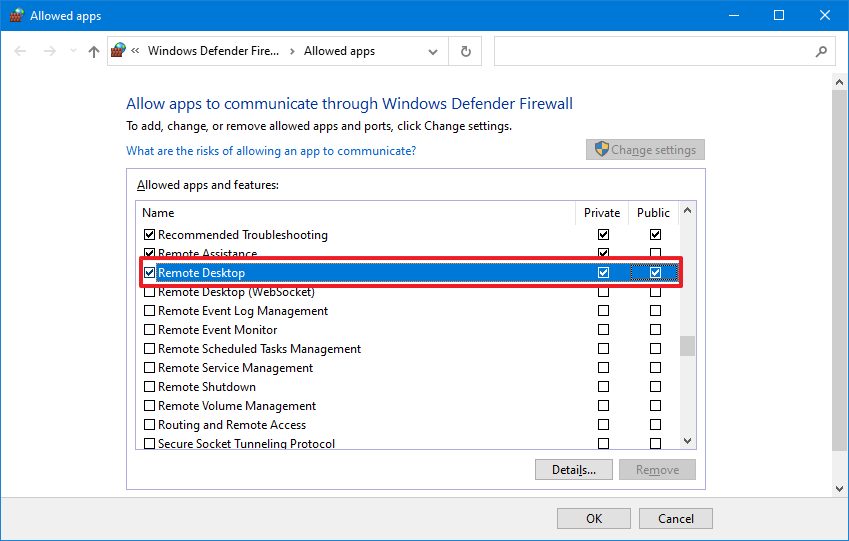
- Click the OK button.
If you have a third-party firewall or antivirus, you may desire to disable these security applications to check if you can connect. Yous may need to check the software support website for more than specific details to complete this task.
Unblock remote connection port
If the settings are correct, and you still can't connect, there's a chance the internet provider is blocking the remote desktop port for security reasons. In this example, you may want to contact the Internet access provider direct to resolve the issue.
Utilise IP address, not the PC proper name
When using the Remote Desktop app, it's amend to apply the device's IP address instead of the computer proper name. Otherwise, you may stumble upon some resolution bug.
Also, when calculation a new figurer, brand sure to enter the appropriate IP address. For case, use the local IP address to connect remotely from within the private network and use the correct public IP accost to connect over the cyberspace.
Confirm remote desktop service
Yous may also not be able to connect because the required remote desktop services are not running on Windows 10.
To determine whether the remote desktop service is running on your device, use these steps:
- Open Beginning.
- Search for Services and click the superlative outcome to open the app.
- Select the Remote Desktop Service and check that the "Status" column reads Running.
- If it'south non running, right-click the service and select the Start option.
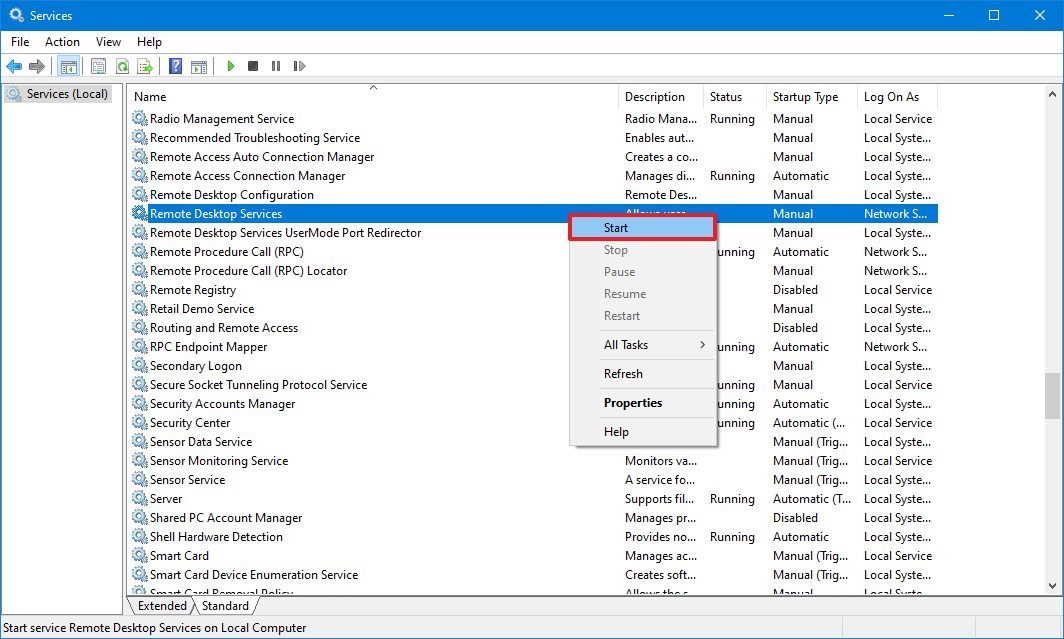
After yous complete the steps, you lot should be able to constitute a remote session on Windows ten.
Switch to Net Protocol Version 4 (TCP/IPv4)
Windows x can use both networking stacks, IP version 4 (IPv4) and version half-dozen (IPv6) — also known as dual-stack — but sometimes, it'll choose version 6 for the connection, which may crusade issues with the remote desktop protocol (RDP).
To set the IPv4 equally the default networking stack on Windows 10, use these steps:
- Open Control Panel.
- Click on Network and Internet.
- Click on Network and Sharing Heart.
- Click the Change adapter settings option from the left navigation pane.
- Correct-click the agile adapter and select the Properties option.
- Articulate the Cyberspace Protocol Version six (TCP/IPv6) option.
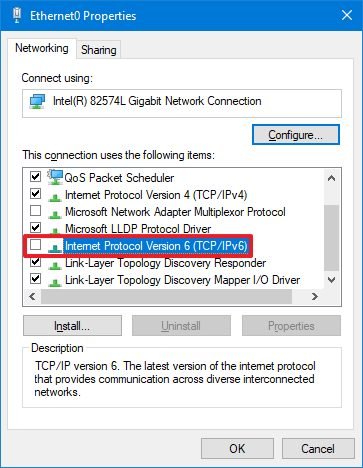
- Click the OK button.
- Restart the calculator.
Once you complete the steps, you should now be able to connect using a remote connection.
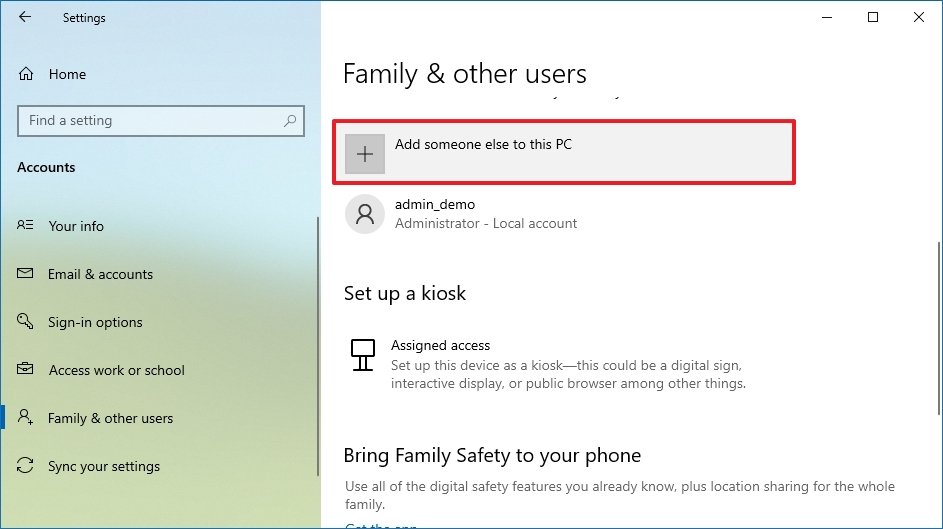
Utilize local account instead of Microsoft account
If you lot try to connect, only the hallmark fails, and you are using a Microsoft account, information technology's probably a trouble with the hallmark method. For case, you may encounter issues if the Microsoft account has the two-footstep verification or passwordless security feature enabled. If this is the instance, yous may want to consider creating and using a local business relationship for remote access.
To create a local administrator account on Windows 11, use these steps:
- Open Settings.
- Click on Accounts.
- Click on Family unit & other users.
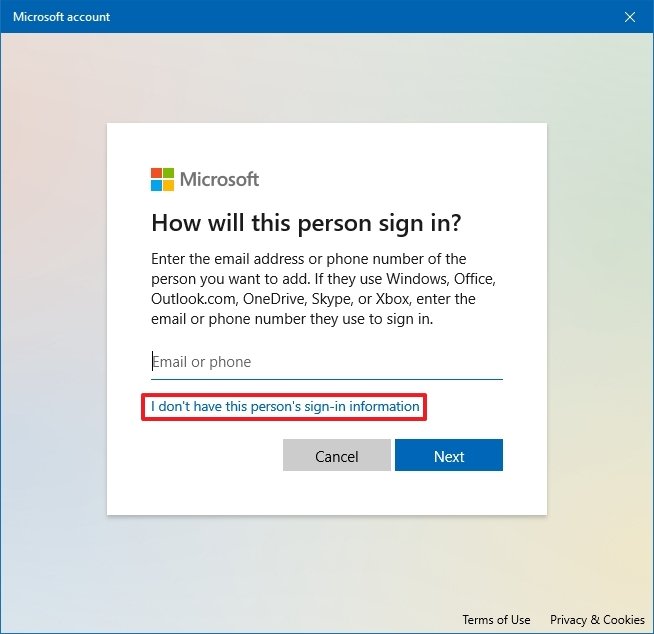
- Under the "Other users" department, click the Add together someone else to this PC selection.
- Click the I don't have this person's sign-in information selection.
- Click the Add a user without a Microsoft business relationship option.
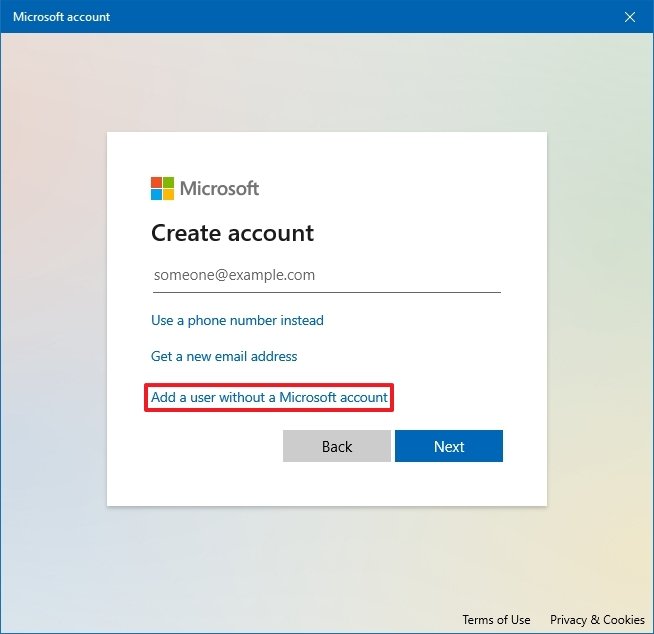
- Confirm the username.
- Create a strong password.
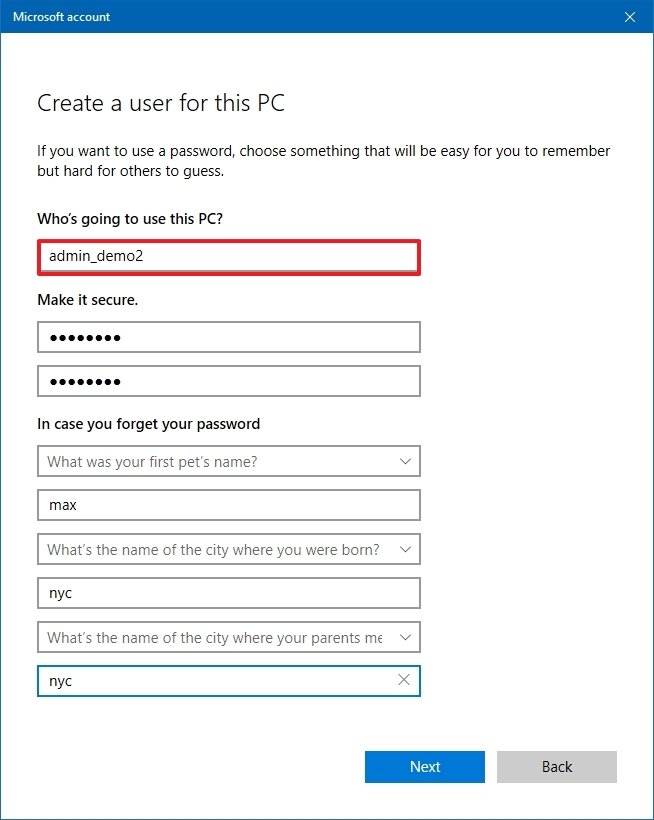
- Complete the security questions to allow countersign reset from the Sign-in screen.
- Click the Adjacent button.
- Select the newly created account and click the Change account type push button.
- Choose the Administrator pick.
- Click the OK button.
After you consummate the steps, you tin can use the local account information instead of the Microsoft account to connect to a remote desktop session.
We outlined the steps to connect to a device inside a private network and through the internet, simply allowing remote desktop connections (mainly through the internet) could be a security risk.
Recall that having the remote desktop protocol enabled and opening ports could allow malicious individuals to gain unauthorized admission to the computer. If you need to use this feature, employ stiff a countersign, disable the remote desktop service and remove the port forwarding settings from the router when they are no longer needed.
More Windows resources
For more helpful manufactures, coverage, and answers to common questions most Windows 10 and Windows xi, visit the following resources:
- Windows 11 on Windows Fundamental — All you need to know
- Windows eleven assist, tips, and tricks
- Windows 10 on Windows Central — All you need to know

Remote Desktop Windows 10 Home Premium,
Source: https://www.windowscentral.com/how-use-remove-desktop-app-connect-pc-windows-10-0
Posted by: fishcurtand.blogspot.com
0 Response to "Remote Desktop Windows 10 Home Premium"
Post a Comment